When people call you Shirtless Chef, this time of year gets a bit challenging and stressful. Maintaining a healthy lifestyle and eating in a slight calorie deficit through November and December can be a daunting task. Most people give up on it all together, and just eat as much holiday foods as they can, while telling themselves that same old thing every year. Say it with me now… “I’ll go on a strict diet and lose all the weight starting January 1st.” Hey, if you can’t lie to yourself, who can you lie to, right?
Then starts a pattern so familiar we could all dance to it if you gave it a drum beat. Everyone goes on a kale and tuna diet for about 6 days while filling the gyms like roaches in a cheap New York City apartment after the lights go out. Then the DOMS hit (delayed onset muscle soreness) from the first workouts done in months, the kale and tuna diet have turned to cravings so bad that even Mother Teresa would shove a kid into oncoming traffic for a slice of pizza, and that extra 10 pounds of holiday weight suddenly has a full ride round trip ticket, next stop Thanksgiving the following year. And so the steady weight creep continues yearly, until one day you are showering in the dark and the mirrors in department store changing rooms prompt language so foul even Quentin Tarantino would hesitate to use it in his movies. I’ve been there, done that, and got the extra-large t-shirt that thankfully no longer fits.
So… what to do when you love holiday foods and desserts, but want to get off that E-ticket vicious cycle ride of mood swings and weight gain? You start by modifying those foods to make them as healthy as possible, and at the same time, upping the taste content to the point where you don’t have to overeat to feel satisfied. Take the humble and simple pumpkin pie, for example. The traditional methods make this a simple sugar calorie bomb full of fast carbs and trans fats that will destroy a waistline, not to mention a heart. Add store bought “whipped cream” with its Frankenstein’s monster list of chemical ingredients, and double those weight and health impacts. Not to mention the taste, which always seems to disappoint and comes off a bit flat somehow, despite all the unhealthy ingredients designed to enhance taste. We can do better, people. This pie can not only be much healthier, but the taste can be improved as well. The much abused and mistreated pumpkin deserves better, and so do you.
All pies start with the crust. If you think pie crusts are something you buy from the frozen food aisle at store, here’s our first chance to up the nutrition, taste, and texture. Pro tip, unless it’s flash frozen veggies, almost every other frozen food is a health and weight loss nightmare, and it’s best to just stay away from this section as much as possible. Let’s take the ingredient list from a standard frozen, pre-made pie crust, shall we?
Enriched Wheat Flour (Wheat Flour, Niacin, Reduced Iron, Thiamine Mononitrate, Riboflavin, Folic Acid), Soybean Oil, Water, Hydrogenated Soybean Oil, Dextrose, Salt, Dough Conditioner (Sodium Metabisulfite).
If you didn’t know that was a pie crust, I’m betting that wouldn’t sound all that delicious. And it’s not, as these things end up with the consistency of glue paste most of the time. Another thing to pay attention to with ingredients is anytime you see the word “hydrogenated” in front of an oil, that means artery-hardening trans fats that are one of the worst man-made concoctions you can put in your body. Even if the label says “no trans fats,” it’s a loophole in the FDA rules regarding percentages, and they are in there.
We are making a pie crust out of coconut flour, grass-fed butter, and VitaFiber powder. Many of you might not be familiar with VitaFiber, it’s a powdered sugar replacement that’s made out of natural tapioca starch, and it sweetens without any of the weird aftertaste that products with Erythritol can have, plus it has 4 grams of fiber per serving, plus gut healthy prebiotics. Amazon is about the only place you can find it, but it’s worth it, and one bag will last a long time.
This crust is easy and quick to make, and it’s so much better than that MSDS chemical list from the frozen variety. Now for the pumpkin itself, if all you’ve had is canned pumpkin, it’s time to roast your own. You can use canned if you must, but the flavor is so much better when you do it yourself. As for the whipped cream, this I must insist that you make yourself. Whipped cream is so easy and quick to make, and the stabilized version keeps fluffy and light in the fridge. Just for fun, here’s the ingredients of store bought whipped topping:
Water, Corn Syrup, High Fructose Corn Syrup, Hydrogenated Vegetable Oil (Coconut And Palm Kernel Oils), Skim Milk, Contains Less Than 2% Of Light Cream, Sodium Caseinate (From Milk), Natural And Artificial Flavor, Xanthan And Guar Gums, Modified Food Starch, Polysorbate 60, Sorbitan Monostearate, Sodium Polyphosphate, Beta Carotene (Color).
No. Just no. That reads like something that if struck by lightning would come to life and eat your pets before wreaking havoc in the neighborhood. Heavy cream, vanilla extract, and a little low carb sweetener is all you need, plus a little gelatin to stabilize it. Give this a try and you will find it’s like trying pumpkin pie for the first time, and you can enjoy eating it without teaching little kids new words the next time you try on clothes at the store.
Roast Pumpkin:
- 1 roasting pumpkin (not the big kind you carve for Halloween)
- Coconut or MCT oil
- Salt
Preheat the oven to 350 degrees. Cut the top off the pumpkin with a large carving knife and then split the pumpkin in two. Scoop out the seeds and fibers, brush the insides with a light coating of oil and a pinch of salt. Place inside down on a baking sheet lined with parchment paper, then poke holes in the outer shell with a fork to let steam escape. Roast for 50 – 60 minutes, remove from the oven and let the pumpkin cool enough to handle, then scoop out the flesh. You can use a bowl and a blend stick to puree, or a food processor. Process until a smooth texture is achieved, then place in the fridge until ready to use.
Coconut Flour Pie Crust:
- ¾ cup coconut flour (75g)
- ½ cup grass fed butter (cold, placed in freezer for 5 minutes)
- 2 eggs
- 1 tsp low carb sweetener
- 1/8 tsp sea salt
Cut the butter into pieces and place in the freezer for a few minutes. Beat the eggs in a bowl, then combine all the ingredients in a food processor, pulsing until combined in a crumbly texture where no large pieces of butter are visible. Remove dough from processor and form into a ball, then cover in a bowl with plastic wrap or freezer bag and chill in the fridge for 30 minutes.
When 30 minutes is up, preheat the oven to 400 degrees. Take a small pat of butter and grease a glass pie pan, then use your hands to spread the dough across the bottom and up the sides. This will take a bit, so be patient and work it until it covers, then use a fork to poke holes in the bottom and sides to vent. Bake for 12 minutes, then cool completely while mixing the filling.
Pumpkin Pie filling:
- 15 oz homemade pumpkin puree
- ½ cup grass fed heavy cream
- 2 large eggs (room temp)
- 1 cup Vitafiber powder
- 2 teaspoon cinnamon
- 1 teaspoon cloves
- ½ tsp nutmeg
- ½ tsp allspice
- ¼ tsp sea salt
- 1 tsp vanilla extract
- 1 tsp blackstrap molasses
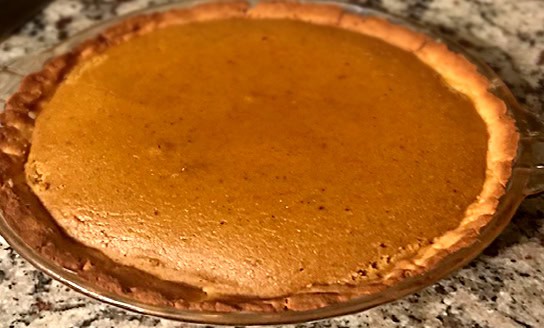
Preheat the oven to 325 degrees. Whisk the room temp eggs, then add the heavy cream, vanilla extract, and molasses and whisk until combined. Pour on top of the Vitafiber sweetener and whisk until smooth. Add all the spices to the pumpkin puree until blended, then pour the egg and cream mixture into the pumpkin and whisk until combined. Pour the filling into the cooled pie crust. Cover the exposed pie crust with foil to prevent burning, then bake for 50 minutes until the center is almost set. Cool on the counter completely, then refrigerate at least an hour, but preferably overnight.
Stabilized whipped cream:
- 1 teaspoon unflavored gelatin
- 4 teaspoons water
- 1 cup grass fed heavy cream
- 1 tbsp vitafiber powder
- ½ teaspoon vanilla extract
- ½ teaspoon Truvia nectar
Place mixing bowl with beaters in the freezer to chill for 20 minutes. Place the water in a bowl and sprinkle the gelatin over it, let sit for 5 minutes. Then warm in the microwave for 10 seconds, stir. Combine the sweetener, vanilla, and heavy cream in the chilled bowl, beat with hand mixer until soft peaks form. Then slowly drizzle in gelatin while still beating until medium peaks form, then drizzle in Truvia nectar and beat until combined. Store leftovers in the fridge for up to a week.
Read all of Jason’s recipes at www.mysaline.com/jason-murphy


